
Connecting accessories to your tablet shouldn’t feel like rocket science. If you’ve just bought a shiny new stylus and are wondering how to connect apple pencil to ipad, you are in the right place. Whether you are an artist sketching your next masterpiece or a student taking notes in history class, getting your Apple Pencil paired correctly is the first step to unlocking your creativity.
This guide will walk you through every single step, troubleshoot common issues, and even help you figure out which Pencil works with which iPad. We’ve broken everything down into simple, easy-to-follow sections so you can get back to drawing or writing in no time.
Key Takeaways
- Identify Your Model: Knowing whether you have a 1st Gen, 2nd Gen, or USB-C Apple Pencil is crucial for the pairing process.
- Check Compatibility: Not every Pencil works with every iPad; compatibility is specific to hardware generations.
- Simple Pairing Methods: Most pairing happens automatically by either plugging it in or attaching it magnetically.
- Troubleshooting: Bluetooth toggling and restarting devices fix almost 90% of connectivity issues.
- Maintenance: Keeping the tip tight and the battery charged ensures longevity.
Why the Apple Pencil is a Game Changer for iPad Users
The Apple Pencil has completely transformed how we interact with touch screens. Before its release, stylus pens were often rubber-tipped, clumsy tools that felt nothing like a real pen on paper. Apple changed that by introducing pressure sensitivity, tilt recognition, and incredibly low latency. Learning how to connect apple pencil to ipad opens up a world where your tablet becomes a powerful digital canvas.
For students, it means annotating PDFs directly without printing them out. For professionals, it means signing documents electronically with a signature that actually looks like yours. The precision is unmatched, allowing for pixel-perfect control in apps like Procreate or Adobe Photoshop. Even for casual users, navigating the interface with a Pencil keeps the screen free of fingerprints and feels surprisingly natural.
This accessory isn’t just about drawing; it’s about efficiency. Features like “Scribble” let you handwrite into any text field, and the iPad automatically converts it to typed text. Once you master the connection process, you unlock features that make your iPad far more than just a device for watching movies.
Understanding the Different Apple Pencil Models
Before you try to connect anything, you need to know exactly what hardware you are holding. Apple currently has three main versions of their stylus, and they all pair differently. Trying to force the wrong method simply won’t work.
Apple Pencil (1st Generation)
This is the original round, glossy white cylinder. It has a silver band near the top and a removable cap that hides a Lightning connector (the same connector used on older iPhones). It is completely round, which means it has a tendency to roll off tables if you aren’t careful. It pairs via the Lightning port or a USB-C to Lightning adapter.
Apple Pencil (2nd Generation)
The 2nd generation model is matte white and has one flat side. This flat side is magnetic and is key to how it charges and pairs. There is no cap to remove and no visible connector. It looks sleeker and feels more like a traditional carpentry pencil. It pairs exclusively through the magnetic connector on the side of compatible iPads.
Apple Pencil (USB-C)
This is the newest budget-friendly option. It looks very similar to the 2nd Gen model with a matte finish and a flat side, but it has a sliding cap at the top that reveals a USB-C port. It attaches magnetically for storage but does not charge or pair wirelessly. You must use a cable to pair it.
Compatibility Check: Which Pencil Do You Have?
Trying to figure out how to connect apple pencil to ipad is impossible if your devices aren’t compatible. If you try to pair a 2nd Gen Pencil with an older iPad, it physically won’t work because the iPad lacks the magnetic charging strip.
Below is a quick reference table to help you match your devices.
|
Apple Pencil Model |
Connection Type |
Compatible iPad Models |
|---|---|---|
|
1st Generation |
Lightning Connector / Adapter |
iPad (6th, 7th, 8th, 9th, 10th Gen), iPad Air (3rd Gen), iPad mini (5th Gen), iPad Pro 12.9″ (1st, 2nd Gen), iPad Pro 10.5″, iPad Pro 9.7″ |
|
2nd Generation |
Magnetic Wireless |
iPad mini (6th Gen), iPad Air (4th, 5th Gen), iPad Pro 12.9″ (3rd, 4th, 5th, 6th Gen), iPad Pro 11″ (1st, 2nd, 3rd, 4th Gen) |
|
USB-C |
USB-C Cable |
iPad (10th Gen), iPad Air (4th, 5th Gen), iPad Pro 11″ (1st, 2nd, 3rd, 4th Gen), iPad Pro 12.9″ (3rd, 4th, 5th, 6th Gen), iPad mini (6th Gen) |
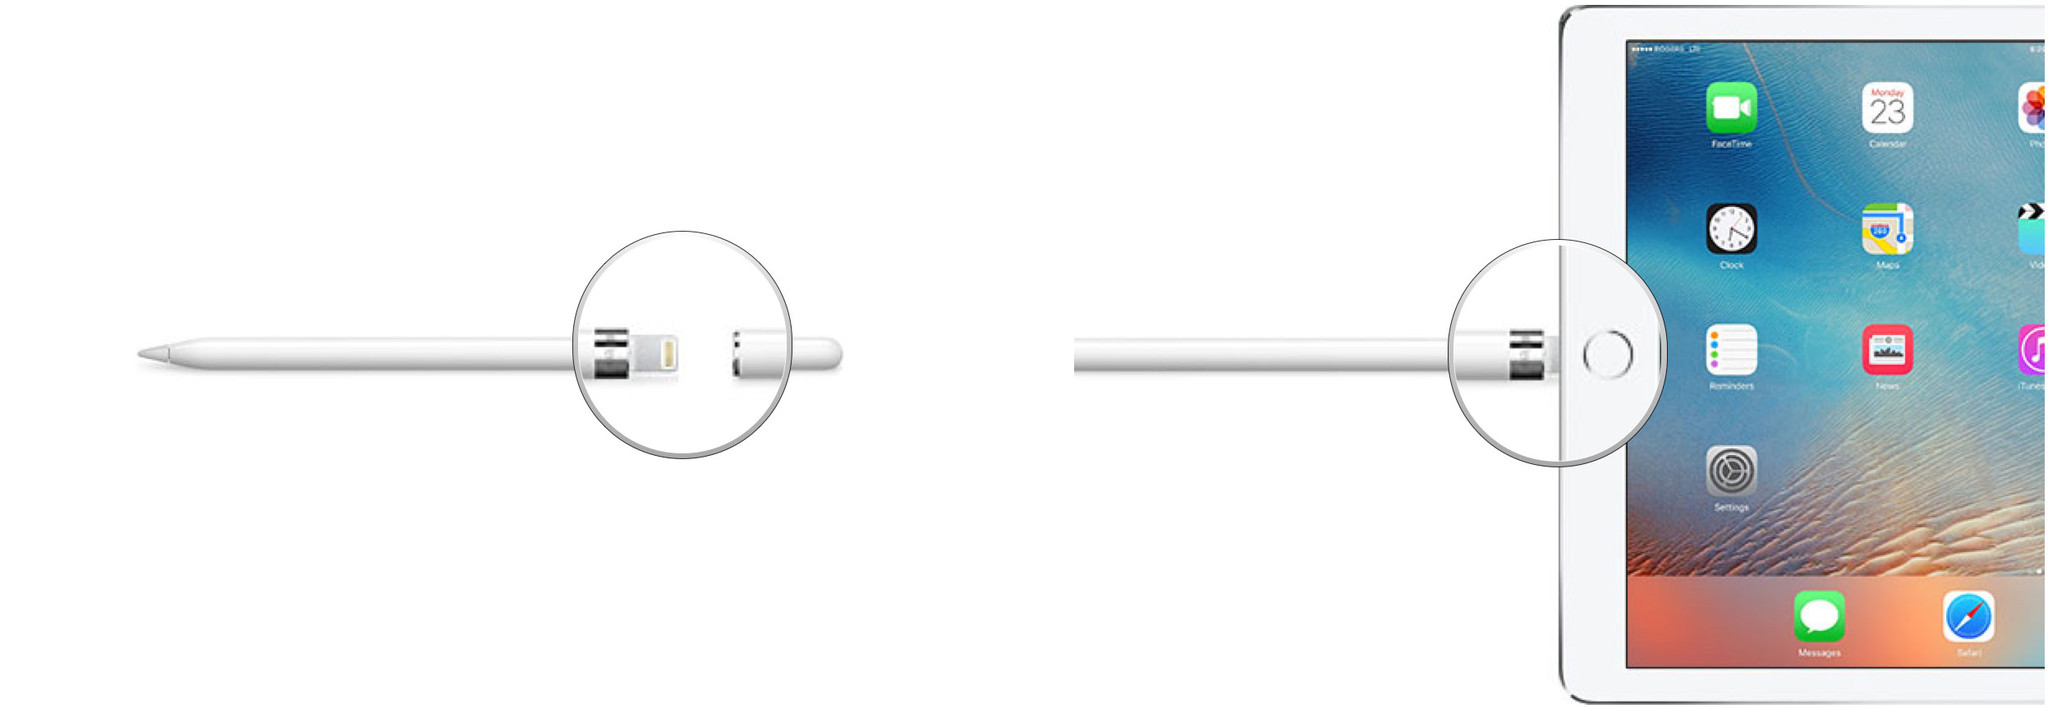
Step-by-Step: How to Connect Apple Pencil (2nd Generation)
If you have the matte pencil with the flat edge, you have the easiest pairing process of all. Apple designed this to be seamless, removing the need for cables entirely. This method relies on the magnetic connector located on the side of your iPad (usually the right side when holding it vertically).
The Magnetic Attachment Method
- Unlock your iPad. Make sure you are on the home screen so you can see the notification appear.
- Locate the magnet. Find the magnetic strip on the long edge of your iPad.
- Snap it on. Place the flat side of the Apple Pencil onto the magnetic strip. It should snap into place with a satisfying click.
- Wait for the prompt. A small banner should appear at the top of the screen showing an image of the Pencil and its current battery percentage.
- Confirm pairing. If this is the first time, you might see a “Tap to Connect” button. Tap it.
Once the banner appears, the pairing is complete. The Pencil will stay connected as long as Bluetooth is on. If you restart your iPad, you might just need to snap the Pencil back onto the magnet for a second to re-establish the connection.
What if the Magnet Doesn’t Work?
Sometimes, thick protective cases can block the magnetic connection. If you are placing the Pencil on the side and nothing is happening, try removing your iPad case. The magnets need close contact to initiate the pairing sequence and charging.
Step-by-Step: How to Connect Apple Pencil (1st Generation)
The 1st Generation Pencil requires a physical connection to initiate the Bluetooth pairing. The method varies slightly depending on whether you have an iPad with a Home button (Lightning port) or the newer iPad (10th Gen) which has a USB-C port.
Pairing with a Lightning Port iPad
- Remove the cap. Take off the small magnetic cap at the end of the Pencil to reveal the Lightning connector. Keep the cap somewhere safe; it is very easy to lose!
- Plug it in. Insert the Pencil’s connector directly into the charging port of your iPad.
- Wait for the prompt. Within a few seconds, a “Bluetooth Pairing Request” pop-up will appear on the screen.
- Tap Pair. Click the “Pair” button on the screen.
- Unplug and use. Once paired, you can unplug the Pencil and put the cap back on.
Pairing with iPad (10th Generation)
The 10th Gen iPad has a USB-C port, but the 1st Gen Pencil has a Lightning connector. To bridge this gap, you need the USB-C to Apple Pencil Adapter.
- Connect the adapter. Plug the Apple Pencil into one end of the adapter and your USB-C charging cable into the other end.
- Connect to iPad. Plug the USB-C cable into your iPad.
- Turn on iPad. Unlock your device.
- Tap Pair. When the Bluetooth Pairing Request appears, tap “Pair.”
Step-by-Step: How to Connect Apple Pencil (USB-C)
The newest Pencil model brings USB-C connectivity to the table. Even though it attaches magnetically to the side of the iPad for storage, it does not pair wirelessly. Many users get confused here because it looks like the 2nd Gen model.
The Wired Pairing Process
- Slide the cap. Slide open the top cap of the Pencil to reveal the USB-C port.
- Get a cable. Use a USB-C to USB-C charging cable.
- Connect both ends. Plug one end into the Pencil and the other end into your iPad’s charging port.
- Wait for connection. The iPad should recognize the device almost instantly.
- Disconnect. Once paired, you can remove the cable. The Pencil will stay connected via Bluetooth for use.
Remember, if you turn off Bluetooth on your iPad, you will likely need to repeat this cable connection process to reconnect the device.
Troubleshooting: When Your Apple Pencil Won’t Connect
It can be incredibly frustrating when you follow the steps on how to connect apple pencil to ipad and nothing happens. Technology isn’t perfect, and glitches happen. Before you panic and assume your hardware is broken, try these troubleshooting steps. They resolve the vast majority of connectivity issues.
Check Your Bluetooth Settings
The Apple Pencil relies entirely on Bluetooth.
- Go to Settings > Bluetooth.
- Ensure Bluetooth is toggled ON.
- Look at “My Devices.” If you see “Apple Pencil” listed there but it says “Not Connected,” tap the blue “i” icon next to it.
- Select “Forget This Device.”
- Now, try the pairing process again from the beginning (plugging it in or snapping it to the side).
Restart Your iPad
It sounds like a cliché, but turning it off and on again works wonders. A simple restart clears out temporary cache files and resets the Bluetooth radio.
- Hold down the power button (and volume button on newer models) until the slider appears.
- Slide to power off.
- Wait 30 seconds, then turn it back on and try pairing again.
Charge the Pencil
If the Pencil has been sitting in a drawer for months, the battery might be completely dead. A dead Pencil cannot broadcast a Bluetooth signal.
- 1st Gen: Plug it into the iPad for at least 15-20 minutes.
- 2nd Gen: Leave it on the magnetic connector for 15-20 minutes.
- If the battery was deeply discharged, it might take a while before the iPad even recognizes that it is attached.
Tips for Maintaining Your Apple Pencil
Once you have figured out how to connect apple pencil to ipad, you want to make sure your device lasts. These accessories are expensive pieces of technology and require a bit of care.
Watch the Nib (Tip)
The tip of the Apple Pencil is made of plastic and wears down over time, especially if you use a “paper-like” screen protector which has a rougher texture.
- Check for roughness: If the tip feels jagged, it can scratch your iPad screen.
- Tighten it: Sometimes connection issues are just a loose tip. Twist the tip clockwise to ensure it is screwed on tightly.
- Replace when needed: Apple sells replacement tips. If you see the metal sensor poking through the plastic, stop using it immediately and replace the tip.
Battery Health
Lithium-ion batteries hate being at 0% for long periods. If you don’t plan to use your Pencil for weeks, charge it to around 50% before storing it. Leaving it dead for months can cause the battery to fail permanently, meaning it will never pair again.
Using the Apple Pencil: Basic Gestures and Features
Connecting the device is just the start. Now that you know how to connect apple pencil to ipad, you should learn how to control it. The integration goes deep into the iPadOS software.
Double Tap (2nd Gen Only)
The 2nd Generation Pencil has a touch-sensitive area on the flat side near the tip.
- Default action: Double-tapping usually switches between the current tool (like a pen) and the eraser.
- Customization: You can change this in Settings > Apple Pencil. You can set it to show the color palette or switch to the last used tool.
Scribble
This feature lets you handwrite in any text box—like the Safari search bar or a Messages reply—and the iPad converts it to typed text. You don’t need to put the Pencil down to type on the keyboard. It even recognizes scratch-out gestures to delete text.
Screenshot
Swipe up diagonally from the bottom-left corner of the screen with your Pencil to instantly take a screenshot. This is perfect for marking up documents or saving web pages quickly.
Best Apps to Test Your Connection
After you succeed in your quest of how to connect apple pencil to ipad, you’ll want to test out the pressure sensitivity and lag. Here are three apps that are perfect for testing your new connection.
Apple Notes (Free)
This comes pre-installed on every iPad. Open a new note and tap the marker icon. It has excellent pencil, pen, and highlighter tools. It’s the quickest way to verify that pressure sensitivity (pressing harder makes a darker line) and tilt (shading with the side of the pencil) are working.
Procreate (Paid)
This is the gold standard for digital art. If you are an artist, this is a must-have. It offers extensive brush engines that utilize every sensor in the Apple Pencil. If the Pencil connects but acts jittery, Procreate has settings to adjust the “Streamline” and stabilization.
GoodNotes or Notability (Paid)
These are the top note-taking apps for students. They are great for testing handwriting recognition and palm rejection. Palm rejection ensures that when you rest your hand on the screen to write, the iPad doesn’t register your palm as a touch input.
Common User Mistakes to Avoid
Even tech-savvy users make mistakes. Here are a few things to watch out for to ensure a smooth experience.
- Wrong iPad Case: Many third-party cases are too thick on the side where the 2nd Gen Pencil charges. If the magnet feels weak, the case is the culprit. Look for cases that have a specific cutout or a thin sidewall for the Pencil.
- Bluetooth Confusion: Turning off Bluetooth in the “Control Center” (the menu you swipe down from the top right) doesn’t actually turn off Bluetooth completely; it just disconnects devices. To truly reset the radio for pairing, use the main Settings app.
- Forgetting to Charge: It sounds obvious, but the 1st Gen Pencil gives no visual warning on the device itself when the battery is low. Check the “Batteries” widget on your iPad home screen frequently.
What to Do If Your Pencil Is Lost
Because the Pencil is wireless, losing it is a common fear. While you can’t “ring” it like you can an iPhone, there are ways to keep track of it.
If your Pencil is connected via Bluetooth, it will show up in the “Batteries” widget. If you are walking around your house and the Pencil suddenly appears in the widget, you know it is nearby (within 30 feet). Unfortunately, the Apple Pencil does not have a “Find My” chip inside it, so you cannot track it on a map like an AirTag. Prevention is key—always snap it back onto the magnet or put it in a dedicated slot in your case.
Frequently Asked Questions (FAQ)
Here are answers to the most common questions people ask regarding how to connect apple pencil to ipad.
Q: Can I use a 1st Gen Pencil on a new iPad Pro?
A: No. The new iPad Pros do not have a Lightning port, and they use the magnetic pairing method which the 1st Gen Pencil does not support.
Q: Why does my Pencil say “Connected” but won’t write?
A: This is usually a loose tip. Try tightening the plastic nib at the end of the Pencil. If that fails, the tip may be worn out and needs replacement.
Q: Does the Apple Pencil work with iPhones?
A: No, the Apple Pencil is designed exclusively for iPads. It will not pair with or work on any iPhone screen.
Q: How do I check the battery level of my Apple Pencil?
A: You can add the “Batteries” widget to your iPad home screen or Today View. When the Pencil is connected, its battery percentage will appear there.
Q: Can I connect multiple Pencils to one iPad?
A: No, an iPad can only be paired with one active Apple Pencil at a time. If you pair a new one, the old one will disconnect.
Conclusion
Learning how to connect apple pencil to ipad is the gateway to using your tablet to its full potential. While Apple’s ecosystem is designed to be intuitive, the different models and charging methods can create some confusion for first-time users. Whether you are plugging in a 1st Gen model, snapping on a 2nd Gen, or using a cable for the USB-C version, the process is straightforward once you know the steps.
Remember to always check compatibility before buying, keep your tip tight, and ensure your Bluetooth is active. With these tips in mind, you will be sketching, writing, and navigating with precision. For more tech tips and updates, check out other guides on British Newz.
The Apple Pencil is a remarkable tool that bridges the gap between analog creativity and digital convenience. So go ahead, connect your pencil, and start creating something amazing today. For more technical history on tablet interfaces, you can read more on Wikipedia.

