
.Is there anything more annoying than the sound of water trickling in the bathroom long after you’ve flushed? It’s not just a nuisance; a running toilet can waste gallons of water daily, driving up your utility bill significantly. Fortunately, learning how to fix a running toilet is one of the easiest DIY skills a homeowner can master. You don’t need expensive tools or a degree in plumbing to get the job done.
In this guide, we will walk you through everything you need to know. We will identify the parts of your toilet, diagnose the problem, and provide simple solutions. By the end of this article, you will have the confidence to tackle this common household issue.
Key Takeaways
- Identify the problem: Most running toilets are caused by a faulty flapper, a bad fill valve, or an improper float level.
- Save money: Fixing a leak yourself saves on plumber fees and lowers your water bill.
- Simple tools: You usually only need pliers, a screwdriver, and replacement parts.
- Test first: Use food coloring to confirm a leak before taking things apart.
Understanding Why Your Toilet Is Running
Before you can fix anything, you need to understand how your toilet actually works. It might seem like magic, but the mechanism inside that porcelain tank is actually quite simple. When you push the handle, a chain lifts a rubber flapper at the bottom of the tank. This allows water to rush into the bowl, flushing away waste. Once the tank is empty, the flapper closes, and the fill valve (often connected to a float) turns on to refill the tank.
If any part of this cycle is interrupted or broken, the water will run continuously. The most common culprit is the flapper not sealing correctly, allowing water to leak into the bowl constantly. The fill valve then thinks the tank is never full, so it keeps running. Understanding these mechanics is the first step in learning how to fix a running toilet.
Common Causes of a Running Toilet
There are usually three or four main suspects when your toilet won’t shut up.
- The Flapper: The rubber seal at the bottom degrades over time.
- The Chain: If the chain is too short, the flapper can’t close. If it’s too long, it gets caught under the flapper.
- The Float: If the float is set too high, water flows into the overflow tube.
- The Fill Valve: The mechanism that refills the tank might be broken.
Essential Tools and Materials You Will Need
You don’t need a fully stocked workshop to fix a toilet. In fact, you can do most of these repairs with your bare hands, though a few basic tools will make life easier. Before you head to the hardware store, check your toolbox.
Here is a quick checklist of what you might need:
- Adjustable Pliers: Useful for tightening or loosening nuts.
- Screwdrivers: Both flathead and Phillips head are good to have.
- Replacement Flapper: Often the solution to the problem.
- Replacement Fill Valve: If the internal mechanism is broken.
- Towels or Sponges: To soak up any water that spills.
- Food Coloring: A clever trick to diagnose silent leaks.
Having these items ready will save you a frantic trip to the store in the middle of a repair. Preparation is half the battle when doing DIY work.
Step 1: Diagnosing the Problem with the Dye Test
Sometimes a toilet runs so quietly you can barely hear it, yet your water bill keeps climbing. This is called a “phantom flush.” To confirm if you have a slow leak from the tank to the bowl, use the food coloring test. This is a pro tip for anyone learning how to fix a running toilet.
Remove the tank lid and place it safely aside. Drop about 10 to 15 drops of dark food coloring (blue or red works best) into the tank water. Do not flush. Wait about 20 to 30 minutes. If you see colored water appearing in the toilet bowl, you have a leak at the flapper valve. If the water in the bowl remains clear, your issue is likely with the fill valve or the float level, rather than a leak at the bottom seal.
Interpreting Your Results
|
Observation |
Likely Problem |
Solution |
|---|---|---|
|
Color in Bowl |
Leaking Flapper |
Replace the flapper |
|
No Color in Bowl |
Float height too high |
Adjust float level |
|
Hissing Sound |
Broken Fill Valve |
Replace fill valve |
|
Water on Floor |
Tank Bolts/Wax Ring |
Tighten bolts or call plumber |
Step 2: Checking the Chain and Handle
Before you start buying parts or getting your hands wet, check the simplest mechanism: the chain. The chain connects the flush handle to the rubber flapper. If this chain has too much tension or too much slack, it ruins the seal.
Remove the tank lid and look inside. Jiggle the handle. Does the chain pull the flapper up cleanly? If the chain is too tight, it holds the flapper slightly open, letting water leak out. If the chain is too loose, it might get tangled underneath the flapper as it drops, preventing a tight seal.
Adjusting the Chain Length
To fix this, you usually just need to move the clip that attaches the chain to the flush lever. You want just a tiny bit of slack—about half an inch—when the flapper is closed. If the chain is excessively long and you can’t adjust it enough, you can cut off the excess links with wire cutters. This is often the quickest fix for how to fix a running toilet without spending a dime.
Step 3: Inspecting and Replacing the Toilet Flapper
If the chain looks fine but the dye test showed a leak, your flapper is likely the villain. Toilet flappers are made of rubber, and sitting underwater 24/7 eventually takes a toll. They warp, crack, or get covered in mineral buildup. When they don’t sit flat, water escapes.
To check it, turn off the water supply to the toilet (there should be a valve on the wall behind the toilet). Flush the toilet to drain the tank. Reach in and unhook the old flapper from the overflow tube. Inspect the bottom of the flapper. If it feels slimy, disintegrated, or hard and brittle, it’s trash.
How to Install a New Flapper
Take your old flapper to the hardware store to ensure you buy the correct replacement. While “universal” flappers exist, they don’t fit every single model perfectly.
- Clean the seat: Before installing the new one, use a sponge or steel wool to gently clean the rim where the flapper sits. Mineral deposits here can prevent a seal.
- Attach the new flapper: Hook the ears of the flapper onto the pegs of the overflow tube.
- Connect the chain: Clip the chain to the handle lever, ensuring proper slack.
- Test: Turn the water back on and watch the tank fill. Listen for silence once it’s full.
Step 4: Adjusting the Water Level (The Float)
If the flapper is fine, look at the water level. Does the water rise so high that it spills into the open tube in the middle of the tank? That is the overflow tube. If water flows into it, the tank will never “fill” completely, and the valve will run forever.
This happens when the float is set too high. The float tells the fill valve when to shut off. If the float is too high, the water level rises above the overflow tube.
Types of Floats and How to Fix Them
- Ball-and-Arm Float: This looks like a balloon on a metal rod. To lower the water level, simply locate the screw connecting the arm to the valve and turn it to lower the float. If there is no screw, you can gently bend the metal rod downward.
- Cup Float (Integrated): This is a cylinder that slides up and down the fill valve itself. Look for a long, thin plastic screw rod or a metal clip. Pinch the clip or turn the screw to slide the float down.
Adjust it so the water level stops about one inch below the top of the overflow tube. This simple adjustment is often the secret to how to fix a running toilet.
Step 5: Replacing the Fill Valve
If you have replaced the flapper and adjusted the float, but the toilet still hisses or runs, the fill valve itself is likely broken. The fill valve is the tall tower assembly on the left side of the tank where the water comes in. Over time, the internal seals wear out.
Replacing a fill valve looks intimidating, but it is straightforward. You will need a bucket and pliers for this step.
- Turn off water: Shut off the supply valve and flush to empty the tank. Sponge out remaining water.
- Disconnect supply line: Unscrew the water supply line from the bottom of the toilet tank (outside the tank). Have a bucket ready for drips.
- Remove old valve: Unscrew the locking nut holding the fill valve in place and pull the old valve out of the tank.
Installing the New Valve
Insert the new fill valve into the hole. Adjust the height of the valve so it fits inside your tank (most are adjustable). Hand-tighten the locking nut underneath the tank, then give it a slight turn with pliers—don’t overtighten or you might crack the porcelain. Reconnect the water supply line, turn on the water, and let the tank fill. You have successfully completed a major part of how to fix a running toilet.
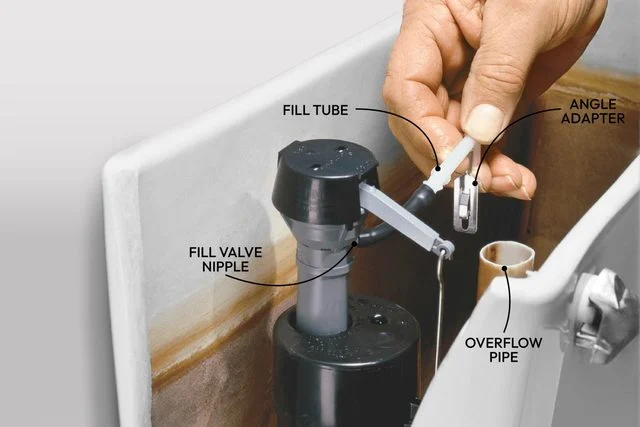
Step 6: Checking the Refill Tube
There is a small flexible tube that runs from the fill valve into the overflow tube. This is the refill tube. Its job is to direct a small stream of water into the bowl while the tank refills, ensuring the bowl water level is high enough.
Sometimes, if this tube is shoved too far down into the overflow pipe, it can create a siphon effect. This constantly sucks water out of the tank, causing the fill valve to turn on intermittently.
Correct Positioning
Ensure the refill tube is clipped to the top of the overflow pipe, pointing inward, but not submerged in the water inside the overflow pipe. If your replacement valve came with an angle adapter or clip, use it. This keeps the tube securely above the water line, preventing siphoning issues.
Step 7: Cleaning Mineral Buildup
If you live in an area with hard water, calcium and lime deposits can wreak havoc on your toilet. These minerals can build up around the flapper seat or inside the valve mechanisms, preventing them from closing tightly.
If you see white, crusty buildup, you need to clean it. You can empty the tank and use vinegar to dissolve the minerals.
- Soak: Turn off the water and empty the tank. Pour white vinegar into the overflow tube or directly onto the flapper seat.
- Scrub: Use a stiff brush (an old toothbrush works great) to scrub the mineral deposits away from the seal area.
- Flush: Rinse everything thoroughly.
Regular cleaning prevents future issues and is a great maintenance habit for anyone learning how to fix a running toilet.
When to Call a Professional Plumber
While most running toilet issues are DIY-friendly, there are times when you should throw in the towel and call a pro. If you have replaced all the internal components (flapper, fill valve, handle) and the toilet still runs, you might have a crack in the tank or bowl. A hairline crack in the porcelain is not fixable and requires replacing the entire toilet.
Additionally, if the shut-off valve behind the toilet is rusted and won’t turn off, do not force it. You could break the pipe inside the wall, causing a massive flood. That is definitely a job for a plumber. Knowing your limits is just as important as knowing how to fix a running toilet.
Maintenance Tips to Prevent Future Leaks
Now that your toilet is quiet, you want to keep it that way. Regular maintenance can save you from doing this all over again in six months.
- Avoid Chemical Tablets: Those blue drop-in bleach tablets look nice, but they eat away at the rubber gaskets and flappers inside your tank. Avoid them to prolong the life of your parts.
- Inspect Regularly: Every six months, lift the lid and listen. Check the chain and ensure the flapper looks healthy.
- Test Shut-off Valves: Turn your wall shut-off valve off and on once a year to prevent it from seizing up due to lack of use.
FAQ: Frequently Asked Questions
Q: How much does it cost to fix a running toilet yourself?
A: Usually, it is very cheap. A new flapper costs between $5 and $10. A complete fill valve kit usually costs between $15 and $25. Compared to a plumber who might charge $100 or more just to show up, doing it yourself is a bargain.
Q: Can a running toilet increase my water bill?
A: Absolutely. A moderately running toilet can waste up to 200 gallons of water per day. Over a month, that is 6,000 gallons! This can add hundreds of dollars to your yearly water bill. Learning how to fix a running toilet pays for itself almost immediately.
Q: Why does my toilet run randomly for a few seconds?
A: This is called “ghost flushing.” It is almost always caused by a slow leak at the flapper. As water slowly leaks out, the float drops just enough to trigger the fill valve for a few seconds to top off the tank. Replacing the flapper usually fixes this.
Q: Do I need to turn off the water to replace the flapper?
A: Technically, you don’t have to, but it makes things easier. If you don’t turn off the water, the tank will try to refill while you are working, splashing water everywhere. It is safer and drier to turn the water off.
Q: What if the water won’t stop running even after I lift the float arm?
A: If you physically lift the float arm all the way up and the water continues to hiss and flow, the fill valve seal is broken. You cannot adjust your way out of this; you must replace the fill valve unit.
Troubleshooting Difficult Leaks
Sometimes, standard fixes don’t work. Here are a few deeper issues.
The Overflow Pipe Issue
If the overflow pipe (the tall open tube in the center) is cracked near the bottom, water will leak out regardless of the flapper. Inspect the tube carefully for hairline cracks. If it is cracked, you usually have to remove the tank from the bowl to replace the flush valve assembly, which is a more advanced task.
Sediment in the Valve
Sometimes, debris from your water pipes gets stuck inside the fill valve seal. You can sometimes flush this out without replacing the valve.
- Turn off water and remove the top cap of the fill valve (follow manufacturer instructions).
- Hold a cup over the open valve.
- Turn the water on slightly for a second to blast out debris.
- Reassemble and test.
Why DIY Plumbing is Empowering
Taking care of your home is a rewarding feeling. There is a specific satisfaction in hearing that annoying hissing sound stop because of your own hard work. Plus, the money you save can be put toward things you actually enjoy. Don’t be afraid to open that toilet tank. The mechanism is simple, the parts are cheap, and the risk is low if you follow instructions.
If you are looking for more helpful home improvement tips and news, you might want to check out resources like British Newz for a variety of interesting articles.
Summary of Steps
- Dye Test: Confirm the leak.
- Check Chain: Ensure it isn’t tight or tangled.
- Inspect Flapper: Clean or replace it.
- Adjust Float: Lower water level below overflow.
- Replace Valve: Swap out the fill valve if needed.
Conclusion
A running toilet is a common household headache, but it doesn’t have to be a permanent one. By following this guide on how to fix a running toilet, you have equipped yourself with the knowledge to diagnose and repair the issue efficiently. Whether it was a simple chain adjustment or a fill valve replacement, you have saved water, money, and your sanity.
Remember, home maintenance is a journey. Start with the small things like a toilet repair, and soon you will feel comfortable tackling larger projects. For more technical definitions and history regarding plumbing mechanisms, you can always visit Wikipedia to learn more about how these systems have evolved over time. Now, go enjoy the silence of a perfectly working bathroom!

